Friday, June 29, 2012

Craft Hoarding & Mother Love

There are 7 weeks and one day remaining until Joshua is due to leave my womb and enter the outside world, and I am on a mission to organize and clean every space in our home before then.
pregnancy calendar

I am currently working (again) on the craft closet. One day I will bite the bullet and turn the whole guest room into a craft room that happens to have a queen size bed in it, but until that day comes, I am limiting my storage area to the guest room closet. Be warned: this next picture is ugly and there is no after photo with which to soothe your eyes.
And this was after I had removed half of the junk in there.
My nesting urge is particularly keen and has allowed me to face the ugly truth: I am a craft supply hoarder. Using all of those years of clinical and therapist training classes, I have discovered the source of my craft hoarding problems: I think that if I can find an unexpected use for an item, I have to buy/recycle/accept the item and store it indefinitely in case one day I need it.
Like the ugly $2 chafing dish purchased from Sam's Club two years ago, since I saw it and immediately thought I could tie small scraps of fabric all over it and use it to store colorful baby blankets on William's bedroom shelf without concealing them. I need help.

While sorting through the horrible mess that once was the craft closet, I came across some letters that my mother wrote to me when I lived in England in grad school. I sat down to read them one last time before throwing them away and realized that they are gems and I'm just going to have to find a place to keep them.
My mother is hilarious; I can't say it enough. She is also a God-loving and wise wise wise woman who has never ONCE in my entire life given me bad advice. If I am as loving and spirit-filled as she is when I am her age, I will consider it a success. She is the reason I understand the importance of studying the Bible and growing close to God. She has shown me first hand that the Bible and its words are life-giving, but you can only share those life-giving words with your children if you have learned them for yourself. But here's a glimpse at her humor, which had Don and me cracking up last night:

"Are you warm? clean? praying? eating well? I'd watch the beef over there. Experts say that mad cow bacteria can live dormant for 20 years and then suddenly come into full swing. Do you know if this is true? Imagine! For lunch one day it's a small, slightly pink in the middle Big Mac, and then one day when you least expect it, BAM - you're all swollen, green, and dead!"

Have a wonderful weekend, friends!

Wednesday, June 27, 2012

A Delicious Green Smoothie

I have a thing for smoothies. The smoothie recipe I make most often for my family is here in this old post, but I have a new favorite. So does William.


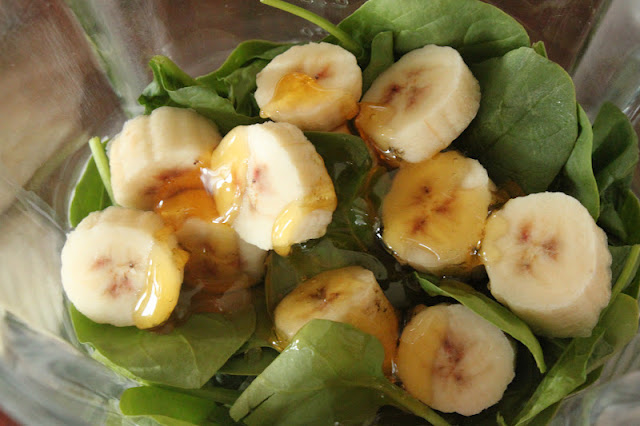
spinach and banana smoothie
Meet Carey. Meet Carey's recipe for a delicious toddler and pregnant mama approved smoothie. Did I mention Carey is a chef? She knows her stuff.
 William thinks there is ice cream in this smoothie. He is mistaken. He had just woken up from his nap and was thrilled that there was a smoothie waiting for him.
 Straws are hard.
 But worth the effort.

I love this smoothie because it isn't thick and so it feels lighter, more like a snack instead of a meal. I mistakenly read Carey's recipe as containing coconut milk instead of almond milk, and so I have been making it with the coconut milk and coconut water (and no almond milk) and it still tastes delicious. The coconut milk is naturally sweet so I don't need to add the honey.
Here's a little tip: I slice fresh bananas and flash freeze them for 30 minutes on a baking sheet. Then I snap the frozen banana slices off the baking sheet and keep them in a ziploc bag in the freezer until I need them. You can also stick a whole banana in the freezer but peeling frozen bananas kills my fingers.

Thanks for sharing this great recipe, Carey! It's a new staple in our house.

Tuesday, June 26, 2012

Feeling Un-Pinteresty

I am taking a long break from anything Pinterest related. A few months ago I reached max capacity with Pinterest inspiration and instead of feeling inspired after adding to my pin boards, I felt drained of creative energy and unoriginal. I think Pinterest is great for some things, but I am currently over it. It's like all of the Vogues and Vanity Fairs and House Beautifuls and Etsy shops exploded into a massive collage of witty sparkly decoupaged pages and honestly, it's just too much for my eyes to handle these days.


So I'm going old-school. I'm browsing fabricworm.com and slowly walking the aisles at Hobby Lobby and Joann's and stopping in my local quilting store. I'm reviewing the old decorating and holiday magazines I've saved since I was in college and feeling inspired by the things that I used to find so beautiful.

And you know what? I think my little projects are benefitting from my pin-crazy hiatus. I've learned to blind stitch and hand quilt and embroider (a little bit) and measure and sew with more precision. Since my eyes aren't inundated with thousands of pictures of what other people find inspiring or fun to look at, I've begun to develop a clearer picture of my own personal style and taste.

William turned two (TWO!) while I was still on bed rest, and I wanted to do my very best to give him some beautiful handmade things. Since I was so limited in terms of movement, we only had a small group of family members over, and it was wonderful to be able to prepare a little party just for him without having to consider color schemes or tiny paper decorations that would be thrown away at the end of the day. It was a party like the ones I remember from my own childhood, with homemade cupcakes and messy but delicious icing (if I do say so myself). For weeks in advance, William told me he wanted "chockit orange cupcakes wif SPRINGLES!!!!!" Emphasis on the sprinkles. I had so much fun making them and not considering whether or not they were pin-board-worthy.


I didn't even use a pastry bag to pipe the icing. I smoothed it on old-school style, with a butter knife, just like my mom did for my birthday parties. I bought pre-made sugar lady bugs from Hobby Lobby (because William loves bugs) and stuck one on each cupcake.
He was in heaven. His second birthday was a lot different from his first, when I was on Pinterest overload.

Where do you stand with Pinterest? Can you go online for a just a few minutes and feel inspired or do you get sucked in and leave feeling a little on the drained side?

Monday, June 25, 2012

Baby Bedding & the Beauty of Sewing

When I was eight months pregnant with William in 2010, I decided on a whim to purchase a sewing machine and learn how to sew. I dabbled in sewing for a few weeks and felt extremely frustrated by the small tasks of learning to thread the machine and refill the bobbin, and I was too intimidated to attempt the scarier side of sewing. And by scary I mean anything involving cutting on the bias, zippers, elastic, or working with a shape other than a square. 

But the strong allure of charming handmade gifts and having customized items that I wouldn't be able to afford otherwise lured me in, and I have continued to drag out my machine and its messy accessories on a regular basis. In fact, our huge dining room table looks this more days than not.
Just keeping it real, people.
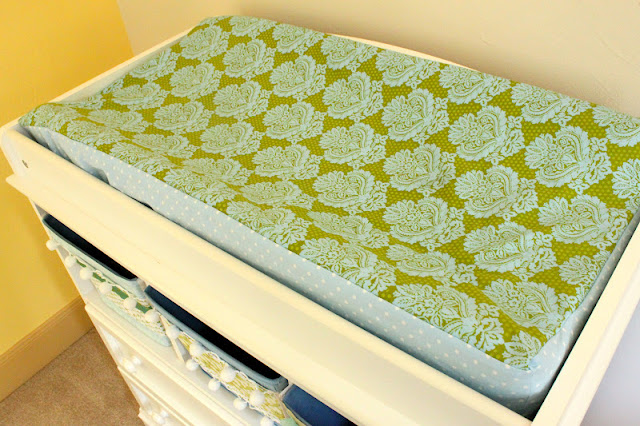
I don't mind the mess because sewing has been a great creative outlet for me, and I always take on projects with instant gratification. Like making changing pad covers for Joshua.
Changing Pad Cover

I used the tutorial for contoured changing pad covers written by A Load of Craft as the basis of my plan for creating the cover, but I didn't follow it for the changing pad pictured above. There's nothing wrong with the tutorial, but the two I made from three cuts of fabric didn't turn out as well as I'd hoped, so I decided to revise the process a bit for myself.

Contoured Changing Pad Pattern
Exhibit A. Just trace the contoured side of the changing pad onto paper (I used wax paper because it was handy).
There is a perfectionist lurking inside me, and I had to fight the urge to make the pattern look straight and pretty. As A Load of Craft points out, the sides of these changing pads are not straight and pretty, so the traced pattern is going to be a little weird looking, too. Accept it and move on.

Remember to sew the contoured side to the top piece as though both pieces have straight edges.
I got the smoothest fit by cutting a single piece of fabric to cover the top and then sewing on the four individual side pieces with enough extra fabric to go underneath the pad and make the elastic casing. I am posting the picture above because I thought the trickiest part was sewing the contoured piece to the center piece of fabric. The pieces should be pinned and sewn as though they are both straight cuts of fabric. 

See that little raised tuck of fabric on the left side of the photo above? That's a result of having the contoured piece pulled down in a straight edge. (Don't be thrown off by the size of the top cut of fabric. I used an old baby blanket that I made for William but we didn't use it much.)

This pad cover is adorable and I haven't found any off the rack changing covers with fabric as cute as this online or in stores, unless we're talking about spending a tiny fortune on baby bedding. Which I am not.

There you have it. A sweet custom changing pad cover for a fraction of the cost of buying one. Let's look at it again, shall we?

Cute! 


Sunday, June 24, 2012

The End of a Season & Budget Decorating

This week at the doctor's office, after twelve weeks on bed rest, my maternal fetal specialist officially ended my restrictions. We've quickly returned to our normal pace around here, with a few big changes. The first two weeks on bed rest were nightmarish for me, only because I was prohibited from engaging my abdominal muscles (that's a tall order!) and I felt like the only thing I could do was sit and worry that we were going to lose a third baby. After those two weeks, though, my body began turning around and my spirit followed suit. I will never forget the amazing things that happened in my heart, our house, and especially my womb during that time. Healing without explanation, beating all of the odds, lots of prayer, and a new understanding of the breadth of God's love for us. In the thirty years of my life, this past year has been a long season of loss and grace and stumbling, but I feel like the repeated losses, at least those related to pregnancy and health, are slowly coming to an end.

On a much lighter note, now that I am no longer on bed rest, I am catching up on getting our house and Joshua's nursery ready for a new baby. We obviously have some major medical expenses right now, so I'm doing my best to keep the cost of this nursery down.

Way down.

We ordered a changing table from Walmart.com (did I mention we're on a budget?) and it has open cubbies at the top to house diapers and wipes. I knew we needed baskets for the cubbies, but I wanted to spend less than $5 a basket, and I wanted something durable, sturdy, and cute.

Slipcovers for Baskets
Never you mind that yellow wall and gold trim. They'll be gone pretty soon!
Last week at Joann's (which has been my only stop on the way home from the hospital, since the store near us is small enough that I can walk around without breaking any of my doctor's rules), I found these blue mesh storage bins on clearance for $4 each, down from $8.99. Score! The down side is that they're ugly. Or at least they were. Now they are cute and I kind of love them.
Cute Cheap Storage

Changing Table Baskets

After staring at them for 15 minutes and contemplating hot gluing fabric to the fronts, I knew I wanted to make slipcovers so that I could change the look in the future (I have big plans for this changing table once there are no more diaper-wearers in this house). I will try to post a step-by-step tutorial later, but I just traced the sides of the box onto paper and used that as a pattern. I used coordinating fabric and ribbons for the front panels and plain muslin for the sides and back. I sewed them snugly so they stay upright once you tug them on and there's no sagging. I have plans for labeling the bins, but these bins came with label pouches sewn on the front and sides, and I used my seam ripper to remove them before I slipcovered them. If you want the labels to remain, just stitch them back on to the front of your slipcover.

I already owned all of the fabric for these boxes, so this project was really just $4 per bin. I am so happy with the way the slipcovers turned out. If you make some of your own, I'd love to see pictures!

Monday, June 11, 2012

Whole Grain Milk Chocolate Cranberry Cookies


Sometimes I want to bake, but I want to bake something that has at least some redeeming nutritional qualities. I adapted this recipe from the Old Fashioned Quaker Oats "vanishing oatmeal raisin cookies" recipe found on the inside of the oats lid. These cookies are slightly crispy on the outside, soft on the inside, and are made with whole wheat flour and dried fruit. They also have nearly two sticks of butter...not that anyone is counting.

*********************************************************************************
Whole Grain Milk Chocolate Cranberry Cookies

1/2 cup (1 stick) plus 6 tbsp. butter, softened
3/4 cup firmly packed brown sugar
1/2 cup granulated sugar
2 eggs
1 teaspoon vanilla
1 and 1/2 cups white whole wheat flour (I prefer King Arthur Flour)
1 teaspoon baking soda
1 teaspoon ground cinnamon
1/2 teaspoon salt
2 and 1/2 cups Quaker Oats (the old-fashioned kind)
1 cup milk chocolate chips
1 cup dried cranberries

1. Heat oven to 350. In large bowl, beat butter and sugars on medium speed until creamy.
2. Add eggs and vanilla; beat well.
3. Add combined flour, baking soda, cinnamon, and salt. Mix well.
4. Add oats, chocolate chips, and cranberries. Mix well with a spatula.
5. Drop dough onto ungreased cookie sheets lined with parchment paper.
6. Bake 10-12 minutes or until light golden brown. Cool on wire rack. Store tightly covered.

*********************************************************************************
I use a medium size ice cream scoop to dole out the cookie dough, and I get about 18 cookies per batch.
If you don't like cranberries, this recipe is easily adaptable to many combinations. I've made it with dried chopped apricots and dark chocolate chunks, or dried apples and pecans. You can also remove the fruit entirely and just enjoy an oat and chocolate cookie. 

These cookies freeze well, baked or raw. If you bake them first, let them cool completely and then store in a ziploc bag in the freezer. If you want to freeze them unbaked so that you can have fresh cookies at a moment's notice, scoop the cookie dough into balls on a baking sheet, but stick them in the freezer instead of the oven. Freeze for 30 minutes or until firm; then wiggle the cookies off the sheet pan and store them in a ziploc baggie in the freezer. Remove them from the freezer ten minutes before you plan on baking them.

Sunday, June 10, 2012

Nesting from Bed (Rest)

There are (hopefully!) nine weeks and six days left before little Joshua is predicted to grace us with his presence, and I have been on a nesting mission. Technically I'm now on "modified bed rest," meaning that our fetal specialist has given me permission to go on brief, non-lifting errands that don't involve me pushing a cart or stroller. Or walking much. I had a million questions about this last week.

Maternal Fetal Specialist (MFM): Things are looking really good. I think you can go on short errands.
Me: Like to Target?
MFM: Um, no. I don't think any woman can be in and out of Target in twenty minutes. 
Me: What if I go only to one section of Target and I have a list so I don't get sidetracked?
MFM: Only if you're willing to ride one of those motorized shopping carts they have.
Me: Okay, so no Target. What about Hobby Lobby?

I worry about judgment from others. I would be afraid someone at Target would think I'm just a big lazy pregnant lady and didn't feel like walking. I'd probably need to make a sign that says "I have a placental abruption, people!"

In other news, my newly modified bed rest has been such a huge blessing. I can bake again.
Whole grain milk chocolate and cranberry cookies cooling in the kitchen
I can sit at the dining room table and sew and finish a million tiny projects I never would have had time for otherwise. 
 Like my favorite burp cloths. William was a major spitter upper as a newborn and I thought the best burp cloths were the Gerber 6-ply cotton cloth diapers with a piece of cotton fabric sewn over the center section. The cotton gives it a bit more stability and looks adorable (at least before it's covered in white curdled milk).
I ordered the fabric for these burp cloths from fabricworm.com.
And making this ruffled wreath from a tutorial on Jones Design Company's website.

And finally finishing our gallery wall. I folded a little crease down the center of these die-cut paper butterflies and hot glued them to the inside of this shadow box. It's funny how such a small change makes a big difference in the overall feel of the room.


And because everyone feels so sorry for me and my bed rest sentence, no one complains (not too much anyway) when I ask for help getting some projects completed before Joshua comes. I have big plans for his little nursery, which is going to be as baby as baby can be. 


This is a picture of me and my mom and big sister on the day I came home from the hospital. See that Jenny Lind crib in the background? That was the crib that my sisters and I each slept in as babies, and it's going to be Joshua's crib, too. I'm so excited about it. I am so thrilled that I'm getting ready to bring our new baby into our family's lives and our home. What an amazing change...to spend time thinking about burp cloths and crib linens and nursery art, a far cry from the way things were just a couple of months ago.

Now if you'll excuse me, this other stack of burp cloths isn't going to sew itself.